Only 24 hours into the swap and I'm feeling great about it. The first two articles showed just how lucky I am to have two really awesome friends who stepped in to get this done. I'm mostly ahead of schedule by about 3 hours at this point, but I still have the unsolved problem of not having RHD specific pedals.
Assembly at this point is pretty much routine, but a little different since Right Hand Drive components are just a little different than the Left Hand Drive counterparts. Since they carry a few differences, I did have to add a few more welds and fabricate a few more brackets to solve the problem. Here is how it all came together for the final assembly.
*Picture Note* - I scheduled the job out for the greatest efficiency to work in the allotted time. The order this Build Blog is written is out of order to the order in which I performed the swap. Some pics may show both night and day time, but the job is still the same.
Many of the spot weld holes from the swap needed to be filled and smoothed all over the firewall and cowl section. While I had the welder out, I took a few minutes to plug them up and ready everything for the pedal reinforcements and HVAC components.
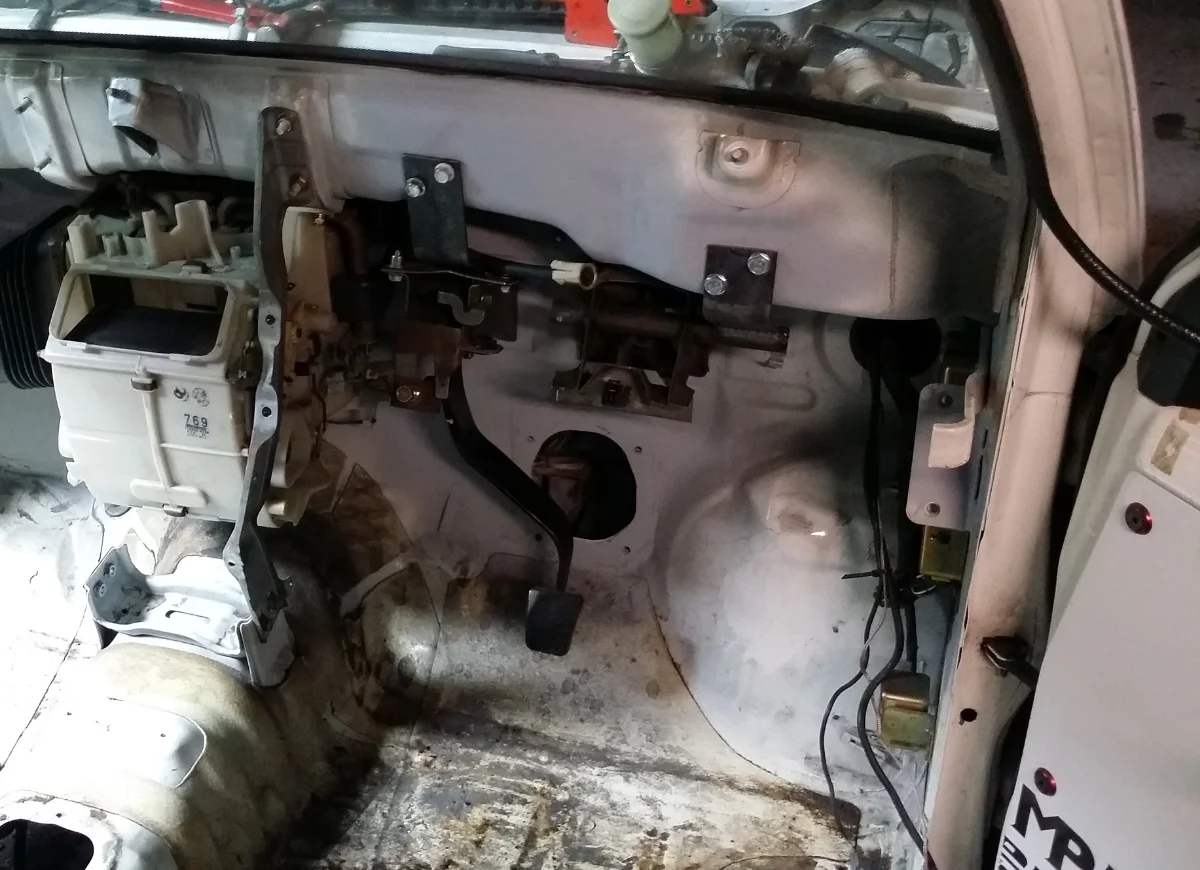
The pedal reinforcements work in conjunction with the firewall reinforcements to reduce flex in the sheet metal which can cause a failure over time. I did go just a wee bit overboard with my metal of choice, but the firmness in the pedals is something I could not have achieved if I used a lesser metal.
In theory, I could easily just weld the reinforcements to the truck. I do believe that is a little tacky/cheap/quickie mod that can easily be avoided. The reason why is dis-assembly; "What if you ever had to take the pedal brackets out for ANY reason?" They would be stuck there if you welded them. The other consideration is metal fatigue resulting from welding. There is a possibility of metal failure around the heat affected zone of the weld from continuous stressing when stepping on the brake pedal.


So what is a mechanical mounting solution that allows easy removal AND involves not heat? The answer is my favorite piece of hardware: RivNuts.
After bending up some 1/8" flat stock to make a hanger bracket for each pedal assembly, I simply drilled the holes and added the threaded rivet.
Now the pedal assemblies can be removed any time and have a lot of added strength.
Take a look at the clutch pedal in the last pic of the slide. Notice how it is sitting right where the brake pedal should be? This is one of the problems I need to address and solve.
Fitting the HVAC components was a breeze. Sadly, the donor truck (shown in Part 1) was not equipped with AC. The LHD Cooling Unit (evaporator) does not fit in the RHD space since it is mirrored. The only option was to leave it out.
Just as the same components brackets could be removed and welded to the opposite side (shown in Part 2), the same transplant could be done for the HVAC components. The only part that required a bracket transplant was the Blower Unit.
The Heater Unit was a direct fit which needed no modification. I simply bolted in as if it was meant to be there since this truck was built with mirrored placement.
With all the HVAC and frame work fitted, the pedal modifications could begin.
Fixing the pedals was actually a bit tough for me. On one hand, this is great because I get to put them wherever I want, which is awesome for ultimate comfort and convenience. On the other hand, I kind of want them to look as OEM as possible and be really clean.
I don't have many pics of the job because it required a lot of undivided attention to do, but here is what I can show.
Modifying the brake and clutch was a breeze. It was nothing more than heating up and bending. A few sections were cut and TIG welded back together followed by a coat of paint.
On to the accelerator. I did get caught up on this one a little bit. I'm not sure if it was a brain fart, creative block, or what. I tried to find a pic of a factory RHD setup with no success. Rather than wasting more time I was running out of, I just made my own. The biggest problem was finding a way to mount the pedal on the flat spot of the wheel well (presumably where it is supposed to be) while maintaining full range of motion.
This was tricky, but here it is the end result.
The accelerator is shown in the pics temporarily held in place by Cleco rivets, but I later mounted it using riv-nuts and fasteners for a much stronger hold.
Finishing the accelerator and pedal assemblies put me on home stretch and close to drive time!
Steering is another blessing from the engineers at Mitsubishi. All I needed was the Right hand drive steering box and nothing else. This is the best install ever, and here is why:
Remember how the firewall is so conveniently mirrored? The frame rails and mounting points are as well. That means the right hand drive specific steering box will simply bolt in place as if it was meant to be there the entire time.


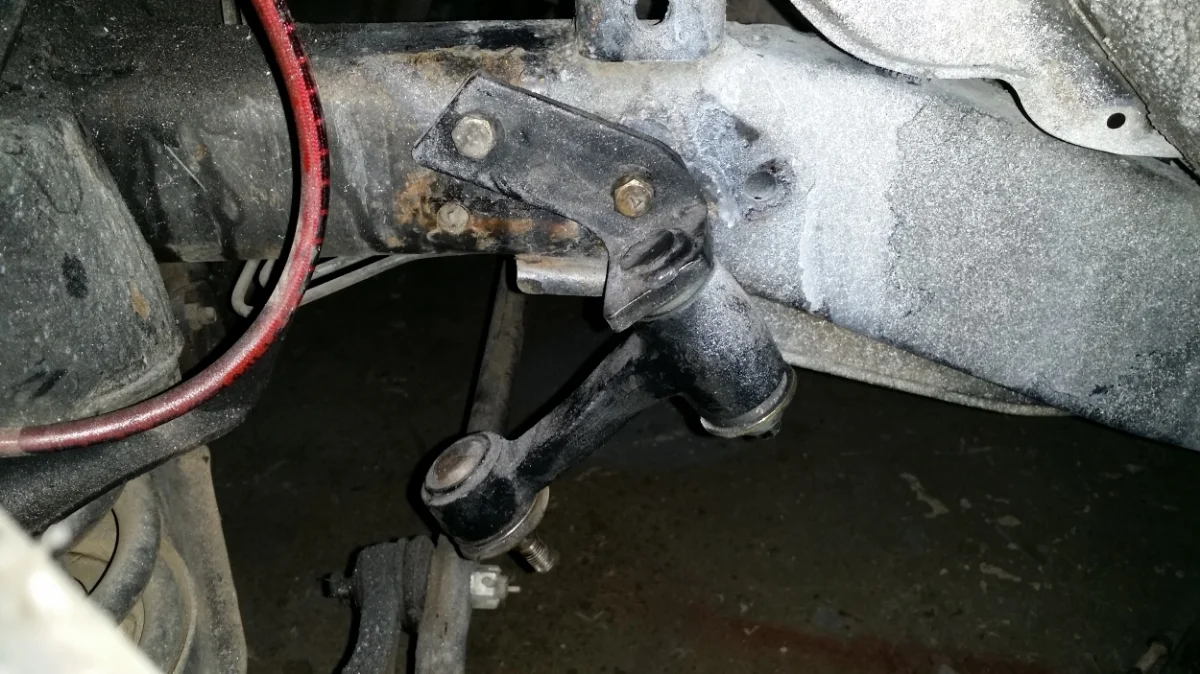
There is a little trick to installing the idler arm. There is a specific RHD assembly, but it is not necessarily needed. Some call it an "old school trick" while others call it "lucky" that it can even be done. I call it the solution.
The idler arm bracket can be flipped around and installed after you add one hole to the frame rail for it to mount. The most important part is measuring the correct mounting angle. You must measure the idler arm angle while it is still on the right side. The same angle must be met on the left in order to find the position of the new mounting hole that needs to be drilled.
Once the hole is drilled, and the bolt tightened, you might never know it was originally on the other side just by looking at it.
I did state before that I wanted to maintain as much of the OEM RHD look as possible, but I chose to route the brake and clutch hard lines lower than factory to keep the engine bay a little cleaner looking (for now). This was a very simple bending job that took 10 minutes.
In addition to the brake lines, a couple other parts had to be added and swapped over to RHD orientation. One component is the speedometer cable. Just as convenient as every other component location was due to the firewall stamping, all I had to do was add a hole and change the routing.
There is also a small spot next to the brake booster for the throttle cable to sit. It was as simple as adding 3 holes and 2 riv-nuts to fasten the throttle cable bulkhead down.
Routing the brake lines, throttle cable, and speedometer cable wrapped up the end of the second to last day. The next day is Christmas Eve. The pedal assemblies knocked my schedule from ahead 3 hours to behind by one hour, and it will be a shortened work day.
At this point in the swap, there is only ONE component awaiting install: the transmission. As mentioned earlier, the transmission is being swapped to a hydraulic unit. These are not extremely common in the US. Starion/Conquest models use a hydraulic clutch action on some transmissions, but they are mated to a narrow block. The truck block is known as a wide block which will not mate to the Starion/Conquest bell housing. In the United States, I only found one RWD transmission equipped with hydraulic clutch action AND wide block casting: the Mitsubishi Montero Sport 2WD 2.4L 4G64. It is pretty rare around here, but I was lucky enough to source one.
While there are a few differences between the two transmissions by themselves, they can be made into a hybrid transmission. Only two changes had to be made to fit into the Mighty Max chassis. One change was the tail housing. The Mighty Max tail housing had to be fitted to the Montero Sport case in order to sit in the correct position in the Mighty Max.
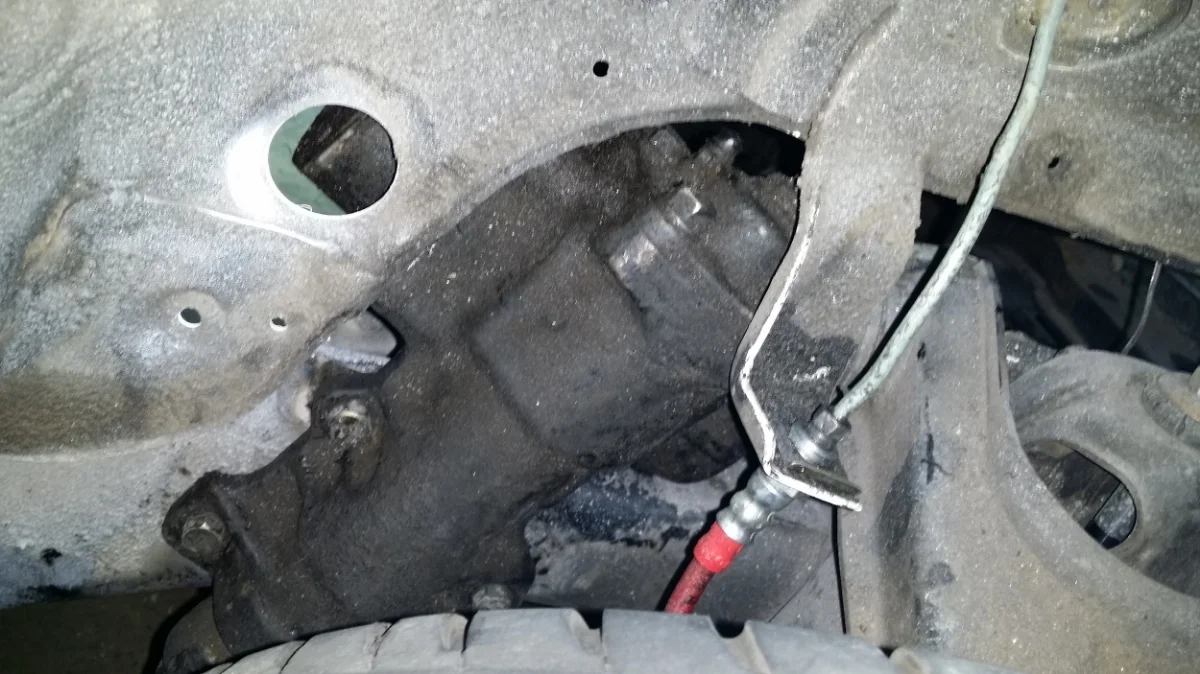
The second change is a portion of the the Montero Sport case casting. This section simply needed to be trimmed to not contact the Mighty Max transmission tunnel.
Once again, the "easy train" made this build even quicker with the clutch hard line to flex line tab already installed from the factory.
Installing the engine was a breeze. It's just the opposite of removal. The only difference (an easy difference) is the starter access is opened up making starter removal a breeze. Access to bell housing bolts became easier as well.
With the engine and trans back in, the truck is ready to roll! By 6:30PM Christmas Eve, I was rolling down the block on the opposite side of the truck.
This is where all the questions started rolling in. I figured a little FAQ would be a great way to end this 3 part write-up.
Q: Is it weird to drive on the right versus the left?
A: For me, not really. I've driven and swapped over half a dozen cars to RHD so I'm kind of used to it. Right or left makes little difference to me.
Q: What was it like getting in and driving for the first time in the truck?
A: While RHD itself isn't unfamiliar to me, getting into the right side of MY truck that I had driven for a year on the left, messed with me. Since I was very used to the same truck (handling, driving, routine), it was strange getting into the same truck on the opposite side.
Q: Do you still get in on the left side by mistake?
A: All the time. My LHD drive cars are just the opposite as well. Sometimes I open the right door to get in and find no steering wheel. I just stop and laugh at myself.
Q: What was the strangest part about switching over to RHD in a familiar truck?
A: Routine. Since am used to getting in the seat and reaching over my left for the belt, I would still do it after I swapped to the right. Shifting was also the same; I would reach for the shifter with my right hand instead of my left at first. New routine was had in about a week after driving.
Q: Do you go through Drive-thru restaurants in reverse now?
A: I did once as a "right of passage" to owning a RHD. It was a pain to do, and the person at the window didn't seem to notice why I was backwards. I've found it to make more of a statement going through forwards. They seem to notice when they open the window to give you food and there is no driver in front of them.
Q: What is the biggest pain or annoyance about RHD?
A: Paid parking structures and gate codes. There really is no way around it. Paid parking garages that require you to collect a ticket before entering, and gated community coded entrance boxes require that I get out of the truck, walk around, enter the code or gran the ticket, walk back around and get back in the truck. The people behind are always staring and wondering why.
Q: What is the number one question you get asked?
A: "Did you get that in England?"
Q: What is the number one statement from people when they realize the truck is RHD?
A: "Hey, your steering wheel is on the wrong side." - I usually reply with: "Actually, it's on the right side."


The final round and finishing pieces needed to get this Mighty Max Right Hand Drive Swap back on the road! Check out what needed to be solved and a cool Q & A at the end!!